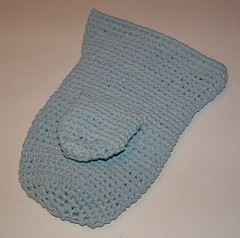
Lining a Crocheted Oven Mitt
 A few weeks ago I shared my crocheted oven mitt project that I made from a recycled cotton bed sheet. At that time I hadn’t been able to line the oven mitt but I just got the lining done and wanted to present the photo tutorial.

Here is my finished product with the lining sewn inside the t-yarn oven mitt. This lining project would work for any crocheted or knitted oven mitt.
The first step in this lining project is to lay out and cut your lining fabric and heat protection material. I used some scrap fabric that I had on hand along with a piece of Insul-Bright insulation material. Insul-Bright is an inexpensive material that provides heat protection and is designed for use in oven mitt and potholder projects. You just need enough fabric to cut out two oven mitt shapes and one shape from the insulation material. You need to cut out two thumbs from the printed lining fabric and the insulation material.
Next step is to lay your finished oven mitt on the material and cut out around the edges allowing for a hem. Leave extra fabric at the top where the oven mitt opens so you can fold it over and machine stitch a hem. Assemble the pieces with right sides together for the print fabric and the insulation material on the outside of the fabric pieces as shown.
Baste stitch around your pieces and test the fit of your lining inside the finished oven mitt to make sure it fits. If your lining glove is too big, just stitch around the inside of your basting to make it smaller. I had to do this to get my fit right. Pin the lining glove inside your mitt to make sure the lining fit is right before doing your final machine stitching around the edges. Don’t worry about attaching the thumb right now, it is added later. Once the lining glove shell is stitched and your fit is good, trim close to stitching to cut away excess material on the lining.
 Click on any photo to supersize
I basted and machine stitched the thumb pieces with right sides of fabric on the inside and then place the insulation material on the outside on both sides of the fabric. Test the fit of your thumb piece inside the finished oven mitt thumb area as shown. Again if its too big, just stitch around the edges again to make the thumb lining piece fit properly inside the oven mitt.
Next step is to add your thumb piece and mark its attachment onto the lining glove shell. Once you have your trimmed thumb piece you want to mark the place where you need to attach it to the lining. I marked the opening using the finished oven mitt and the lining piece as my guide. Check your opening carefully before cutting. Because I used Insul-Bright material only on one side of the lining, mark your opening on the side that has the insulation material as this is the thumb side. Make sure your mark is in the right spot to match where it needs to go for a proper fit inside the finished oven mitt. I also measured the distance between the thumb and the sides as an added check before cutting. Once you are sure of the opening, use a seam ripper to gently open the split. Open the split only as wide as needed to fit the thumb lining inside the opening.
Here is a photo of the thumb piece pinned to the lining. I machined stitched it and then did some hand sewing to get the ends closed up nicely as my sewing machine just didn’t want to stitch it closed very well. The next photo is showing the thumb piece on the inside of the lining before it was turned to fit into the finished oven mitt.
Here is the finished oven mitt lining piece. I turned the thumb piece out and it’s ready to be slipped inside my crocheted oven mitt. Once inserted inside the oven mitt, I hand stitched the lining along the outer edge of the oven mitt shell to secure it in place.
This completes my photo tutorial on how I lined my crocheted oven mitt. Some people say you don’t need to line the mitt if you use heavy yarn or thick recycled materials but I added the lining for extra protection. Plus I think the printed fabric adds a nice touch to my crafted oven mitt project.
Tags: lining-tutorial, oven-glove, oven-mitt, oven-mitt-lining


Apr 11, 2011
What a great step by step tutorial. I had never heard of Insul-Bright before but now that I have I’ll be looking for it at the sewing store when I’m on the big island.
Apr 14, 2011
[…] more heat protection, I added a sewn lining into the crocheted oven mitt. Here is the link to my oven mitt picture tutorial. You could use this tutorial to line any type of oven mitt whether it was crocheted, knitted, or […]
May 07, 2011
Anything saved from the landfill is a good move. Very crafty and useful idea.