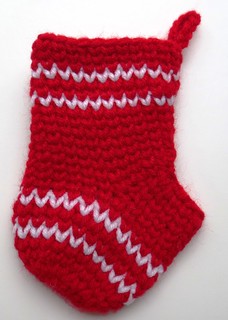
Waistcoat Crochet Mini Christmas Stocking
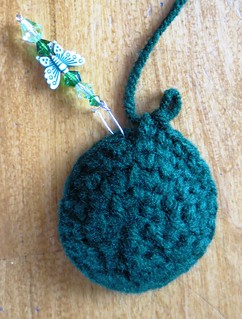
Here is a new crochet pattern for a mini 6 inch long Christmas stocking. This pattern uses the waistcoat stitch. I love the look of this stitch as it appears to be a knitted sock when it is really crocheted. Here is a link to a waistcoat stitch tutorial to help demonstrate how to crochet this knit-look stitch. I also found doing graph images can add a nice touch to a crocheted waistcoat stocking.
I have been practicing this stitch and I must say it is a bit hard to master. It is very dense and finding the V space to crochet into can be difficult. I found a larger crochet hook helps and crocheting in bright light makes it easier too. One important tip to pass along is to go slow and have patience as you crochet this stitch. I also found that the more I practiced the stitch, the better I became so keep at it if you find it difficult.
In working the heel in waistcoat stitch, you have to cut the yarn for each row. I found in future stockings I crocheted that it was easier to work the heel in regular single crochet stitches. It also helps so the heel isn’t so pointy looking. I have included both options below in the written pattern. So if you want to do the whole stocking in the traditional waistcoat stitch you can or use option 2 below.
Waistcoat Mini Christmas stocking pattern
+++++++++++++++++++++++++++++++++++++++++++++++++++++++++++++++++
5-1/2 to 6 inch Mini Christmas Stocking
H (5 mm) crochet hook – 1 ounce of medium weight yarn (50-52 yards)
Chain 3 and join to form circle or you can use a magic circle.
R1: 6 Sc (USA single crochet stitch) in the circle. No need to join. Use marker if needed.
R2: 2 Sc in every stitch of the previous round for a total of 12 Sc.
R3: Work 2 waistcoat Sc in each Sc-V space of the previous round for a total of 24 Sc.
R4-R5: Work 1 waistcoat Sc in each Sc-V space as before. Make sure your stitches are in the V space and are lined up. (24 Sc)

From this point I won’t say to work in each Sc-V space as the entire sock is now worked in the waistcoat stitch into the Sc-V space of the previous round. Just continue working in the pattern for the rest of the stocking.
Color changes: After the last stitch draw up the last loop from the back to do a blind join on the inside of the sock. This is done by taking the crochet hook out of the loop and insert it from the back to the front to pull the loop to the back of your work. Join the new yarn color at the back or inside of the sock. Carry other yarn not in use on the inside of the sock.
R6: With white yarn work 1 waistcoat Sc into each stitch around. Change yarn back to main color with a blind join.

R7-R8: With main color, work 1 waistcoat Sc into each stitch around. Change yarn back to white yarn with a blind join.
R9: With white yarn work 1 waistcoat Sc into each stitch around. Change yarn back to main color with a blind join. Break off white yarn at this point and reattach later for the stripes on the upper sock portion.
R10-11: With main color, work 1 waistcoat Sc into each stitch around.
Heel – 2 options shown below
R12: Work 1 waistcoat Sc into each stitch of the next 12 stitches. Cut off yarn at end of row and leave a small tail so it can be woven in to secure the last stitch. You will be working across on the right side of the sock on each of the following rows of the heel to keep in the waistcoat stitch pattern.
R13-16: Attach main color yarn into the first stitch loop of the previous row, chain 1 and work 1 waistcoat Sc into each stitch of the next 12 stitches on the heel row. Cut off yarn at the end of each row and repeat for a total of 5 rows for the heel.
Option 2 for heel:
I have found working in regular Sc stitch for the heel is easier so below is that option.
R12: Work Sc stitches across in next 12 stitches, chain 1 and turn.
R13-15: Sc in each stitch across, ch 1 and turn.
R16: Work Sc in next 5 stitches, work Sc together over next 2 stitches (decrease made), then work Sc in each remaining stitch across.

Close back seam of heel with a whip stitch later after you finish the sock or you can do it now if you’d like.
R17: (If used heel option 2, just slip st together at top of heel to join and begin working Sc’s.) Attach yarn at back of heel edge and working down the end stitches of the heel row, work Sc’s along the end of each row. Don’t worry about working the waistcoat Sc stitch until you come to the toe portion of the sock. Work 1 waistcoat Sc into each stitch across the toe keeping in the waistcoat stitch pattern until you come to the heel, work Sc stitches evenly along in row end until you come back up to the beginning of the heel back. Join with a Sc to the other edge of the heel so you can work in the round at the point on the upper portion of the sock.
R18-R21: Work 1 waistcoat Sc into each stitch of round. You should have about 23 stitches. Don’t worry if you have a stitch less or more as it doesn’t matter as this is just the width opening of your stocking. End of round should be at the heel back.

R22-R25: Work1 waistcoat Sc into each stitch of round. Just work in the round without joining for the upper leg portion. At the end of round 25, work a blind join on the inside of the sock to change yarn color to the white yarn.
R26: With white yarn work 1 waistcoat Sc into each stitch around. Change yarn back to main color with a blind join.
R27-28: With main color, work 1 waistcoat Sc into each stitch around. Work a blind join on the inside of the sock to change yarn color to the white yarn again.
R29: With white yarn work 1 waistcoat Sc into each stitch around. Change yarn back to main color with a blind join. Cut off white yarn at this point with a small tail to weave under end as you are done with the white.
R30-R34: With main color, work 1 waistcoat Sc into each stitch around. Before last stitch of round 32, end with a slip stitch into the space before the last stitch.
Chain 10 for hanging loop and join with a slip stitch into the next space at back of heel to attach the hanging loop. Adjust your last stitch as needed so your hanging loop is at the center back of the sock.
Weave under all ends and close back of heel if you didn’t already whip stitch it closed.

This pattern is copyrighted by Cindy of My Recycled Bags {dot com} and may only be used for charity and private individual use. No commercial sales or use of my patterns or photos are permitted. Links to this pattern are acceptable and appreciated. ©2017
****Please do not copy my patterns on your blog site or post my patterns on Internet sites. I do not allow my patterns to be republished without expressed written permission. Posting of my patterns, without written permission is in violation of my copyrights and is content theft.
Tags: Christmas, Christmas-ornaments, Christmas-sock, crochet, free-pattern, mini-Christmas-stocking, sock, stocking, waistcoat, waistcoat-stitch


Mar 22, 2017
Its really amazing blog with very much helpful information, thank you so much for writing this great blog here for us.