Patterns: Yarn
Patterns in regular yarn: dishcloths, potholders, hats, scarves, baby items, blankets and stockings.
Filter all patterns
·
Sort: Name (A to Z)
Newest first

This recycled craft project was created by me out of necessity. I needed a pot handle cover for my old cast iron skillet. The handle gets hot and I wanted a sleeve type cover that I could just leave on the skillet. Well I grabbed some curled t-yarn or tarn and started crocheting. Here are my two finished t-yarn skillet covers.
Maybe you haven’t heard about t-yarn yet. Well it’s yarn you create from old recycled t-shirts. You take the t-shirts and cut them into long continuous strips. I then stretch it which causes the t-yarn to curl in on itself. Here is a picture tutorial if you’d like to make your own t-yarn.
The nice thing about t-yarn or tarn is that it stretches and fits snugly on my skillet handle. I also wanted to make one using regular rug so I crocheted this handle cover using some thrift store black rug yarn.
So whether you’d like to crochet your handle cover using recycled materials or regular yarn, here is the free pattern and details below. This pattern is easily adaptable for pots and skillets of different sizes. It’s a very easy pattern with simple stitches that works up quickly. So what are you waiting for — Grab your hook and crochet!
Free Crocheted Pot Handle Cover Pattern
Finished handle cover shown is 5″ long and 1-3/4 to 2″ wide
Materials:
1 oz) T-yarn cut about 1/2″ wide and stretched or chunky rug yarn
Hook: J (6 mm) crochet hook
Rnd 1
Using T-yarn or regular yarn, ch 10 and join with Sl St to form a ring.

Here is my very thick front post crocheted hat. The hat is crocheted by working all front post double crochet stitches in the round. The result is a comfortable very heavy winter hat that will keep you warm.
You can add a few extra rounds to make a longer hat as this is one more of a helmet cap as shown. I have included changes for a smaller ladies or youth size in the free crochet pattern below.
Thick Front Post Crocheted Hat Pattern
Hook: H (5 mm) US sized crochet hook
Materials: 3.5 ounces (200+ yards) Wool or Worsted Medium Weight Yarn
I love this Wool in Dark Navy used in hat shown. (210 Yards)
Finished size: 22 inch cir and 8 inches long for adult size hat
With H hook, Ch 4 and join to form ring. Hat pattern is worked in the round without turning.

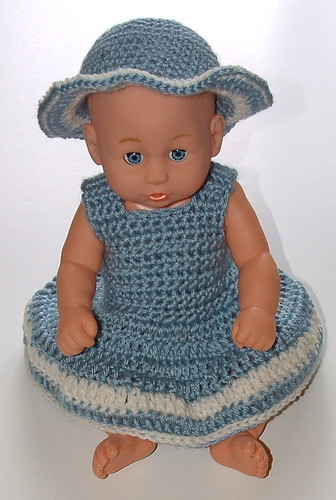
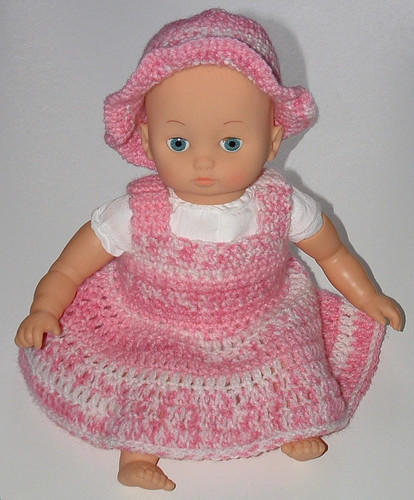
My latest recycled crafting project involves these two baby dolls. I got these dolls at my local thrift store. Both dolls just needed a little cleaning and a new outfit. I crocheted both dolls a new dress and hat. Buying these used dolls was very reasonable. One was only 99 cents and the other $1.99 but with new outfits, they have a new life and look great. They both will be going to my local woman’s shelter for some little girls to find joy with a new baby doll.
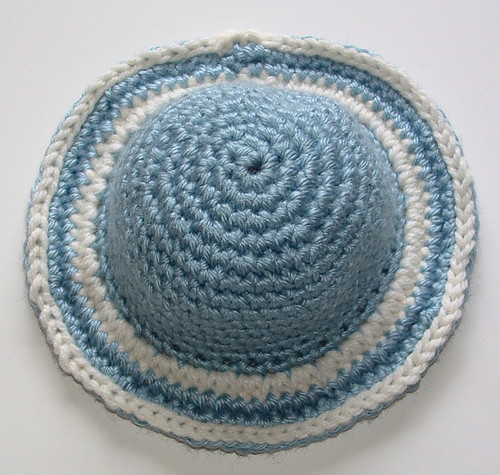
Here is a closeup of the hat. I worked one round in white yarn and then did white trim by working a slip stitch in the final round. You can click on any of the photos to supersize them.
I used Hooksandknives.blogspot.com doll dress and hat pattern for both outfits. I crocheted using a H (5 mm) hook with worst weight 4 ply yarn. My dolls are 12 inches tall and I did a little modification on the neckline and straps as outlined below. Unfortunately the blog that was hosting the original doll dress and hat patterns is no longer in existence as of 2015. But I was able to find the pattern details and added them to the post below.
**Original Doll and Hat pattern from Hooksandknives.blogspot**
Doll Dress Pattern
Body of dress
Ch 35
Row 1: sc in the 2nd ch from the hook, sc across to end (34 sc)
Row 2: ch 1, turn. sc across
Rows 3 to 9: repeat row 2
Row 10: ch 1, turn. sc in the first st, (2sc in the next st, sc in the next st) repeat to end, ending with sc in the last st
Row 11: ch 3, turn. dc in each st across.
Row 12: ch 3, turn. dc in first st, 2dc in next st, (dc in next 2 sts, 2dc in next st), repeat across, then dc in last st
Row 13: repeat row 11
Row 14: repeat row 11
Row 15: repeat row 12
Row 16: repeat row 11
Row 17: repeat row 12
Row 18: repeat row 11. Finish off, leaving a long tail, about 18 inches. Use this for sewing the back together up to last sc row. Leave the rest of the sc rows unsewn, allowing an opening for dressing the doll easily. Weave in ends.
Straps (make 2)
Ch 15.
Row 1: sc in 2nd ch from hook. sc across to end.
Row 2: ch 1, turn. sc across to end. Fasten off, leaving 10 inch tail for sewing one end. Sew ends to front and back of dress.
Ties (make 2) Used for closing top of back of dress by tying in a bow
Ch 30.
Sl st in 2nd ch from hook. sl ti in each st across to end. Fasten off, leaving tail for sewing. Sew each tie to the top corners of the back of dress.
Hat Pattern
Worked as a spiral without joining. Use stitch markers […]

Here is a new mini Christmas stocking crochet pattern. This 6 inch long stocking pattern features a ribbed cuff and is worked top-down. There is an option for a folded over cuff which was a later idea added to the original pattern. Directions for both styles are listed in the free crochet pattern below.
Top-Down Crocheted Mini Christmas Stocking Pattern
G (4 mm) crochet hook – approx. 52-55 yards depending on yarn medium weight yarn
or 56-60 yards for longer fold-over cuff option.
With Caron Simply Soft yarn- length is 6 inch long from top cuff to toe. 2.75 inches wide across top cuff.
With Red Heart Super Saver yarn- length is 6-1/3 inches long. 3 inches wide across top cuff.
R 1: Leaving a long tail to start, chain 8 and Sc in the 2nd chain from hook. Ch 1, turn. (7 sts)

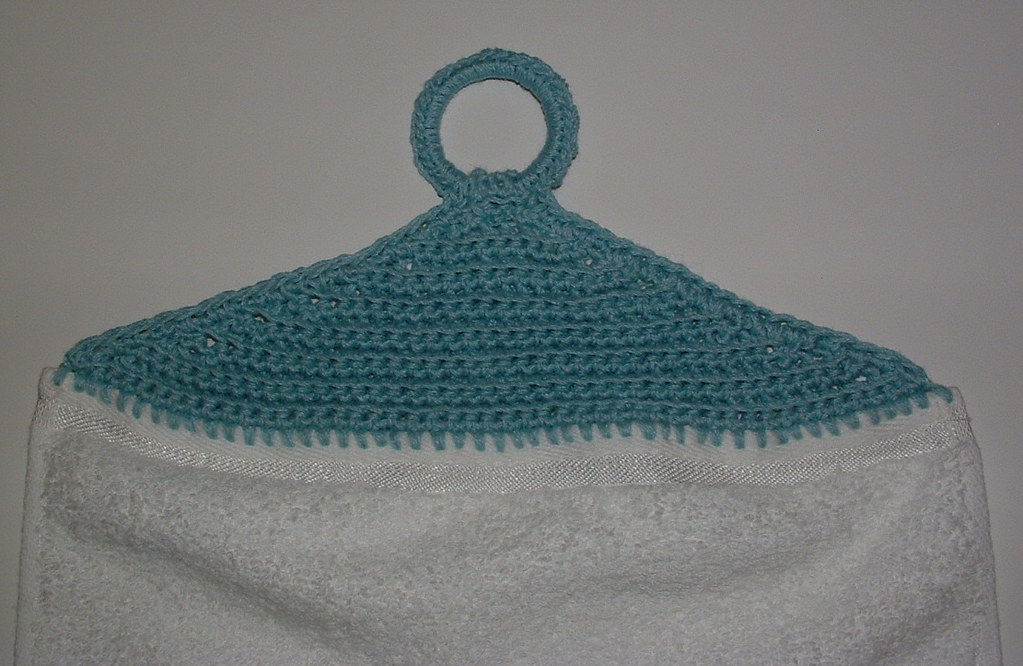
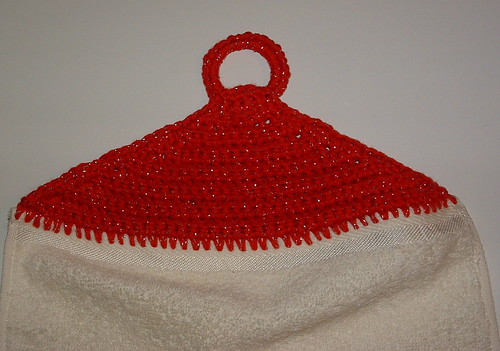
My triangle towel topper uses a finger towel and a recycled plastic milk jug ring for a hanger. I really like the idea of the round ring as you can hang up the towel on a cabinet knob or hang it up over a hook. It works up very quickly and I made the first one using less than an ounce of thrift store sport cotton. This one had 48 stitches along the top as the yarn was thinner.
Here is a closeup of the finished top. You can click on the photo to supersize it.
When I made the red triangle towel topper, I used regular cotton weight yarn. It’s Bernat Christmas Sparkle.
Because the red triangle towel topper is a thicker weight yarn, it has 44 stitches across the top edge of the towel to start. But don’t worry about the number of stitches across the top, just do your single crochet stitches evenly along the top edge. You can always adjust your stitches as needed as you work your topper. I did one extra row for the flap on the red topper. With 4 rows, the turning flap was a bit longer but you can do just 3 rows if that works for you like I did with the sport weight yarn on the blue triangle towel topper.
I used Christmas finger towels for this project but you can use towels of different widths or lengths. Just adjust your stitches as needed to end with a 4-stitch wide flap for the fold over the plastic ring. I used plastic milk jug rings but you can also use recycled juice or other round rings for this project. Make sure you crochet lots of stitches around the plastic ring to cover it entirely with the yarn. I found this gives the project a nice look and no one with ever know that you used an old plastic jug ring for your crochet project.
As always please enjoy the free pattern below and happy crocheting to all!
Crocheted Triangle Ring Towel Topper
Materials needed:
Finger towel – 10 inches wide by 16 inches long used
Plastic milk jug ring 1-1/2″ wide
1 oz. Cotton yarn
Finished topper: 10″ wide & 5″ long from top of ring to towel top edge
Hooks:
#7 Steel crochet hook
G (4-4.25 mm) crochet hook
Directions:
Because finger towels are shorter, there is no cutting or sewing necessary to begin your base row. You will use the steel hook to poke the first hole into the right side corner and pull the yarn through the hole. Then use the G hook to complete your first Sc st. Then move onto the next hole until you have worked completely across the base row evenly with your stitching. Once you have the base row done, you will only be crocheting with the G hook.
Row 1
Using the steel crochet hook as explained above to poke holes, Sc evenly along the top edge of towel.

I have a new crochet stitch that I am just in love with. It is called the V Stitch and it is very easy and simple to crochet many different projects using this stitch. I have already used the stitch pattern to make a blanket and a scarf.
There are several different versions of the V Stitch and I do mine without a chain stitch between my double crochet stitches. It makes for a less-holey project and works up faster for me without having to chain between stitches.
To crochet the small blanket or lapghan, I chained 101 stitches to start with a H (5 mm) crochet hook.

Here is a new crochet pattern for a mini 6 inch long Christmas stocking. This pattern uses the waistcoat stitch. I love the look of this stitch as it appears to be a knitted sock when it is really crocheted. Here is a link to a waistcoat stitch tutorial to help demonstrate how to crochet this knit-look stitch. I also found doing graph images can add a nice touch to a crocheted waistcoat stocking.
I have been practicing this stitch and I must say it is a bit hard to master. It is very dense and finding the V space to crochet into can be difficult. I found a larger crochet hook helps and crocheting in bright light makes it easier too. One important tip to pass along is to go slow and have patience as you crochet this stitch. I also found that the more I practiced the stitch, the better I became so keep at it if you find it difficult.
In working the heel in waistcoat stitch, you have to cut the yarn for each row. I found in future stockings I crocheted that it was easier to work the heel in regular single crochet stitches. It also helps so the heel isn’t so pointy looking. I have included both options below in the written pattern. So if you want to do the whole stocking in the traditional waistcoat stitch you can or use option 2 below.
Waistcoat Mini Christmas stocking pattern
+++++++++++++++++++++++++++++++++++++++++++++++++++++++++++++++++
5-1/2 to 6 inch Mini Christmas Stocking
H (5 mm) crochet hook – 1 ounce of medium weight yarn (50-52 yards)
Chain 3 and join to form circle or you can use a magic circle.

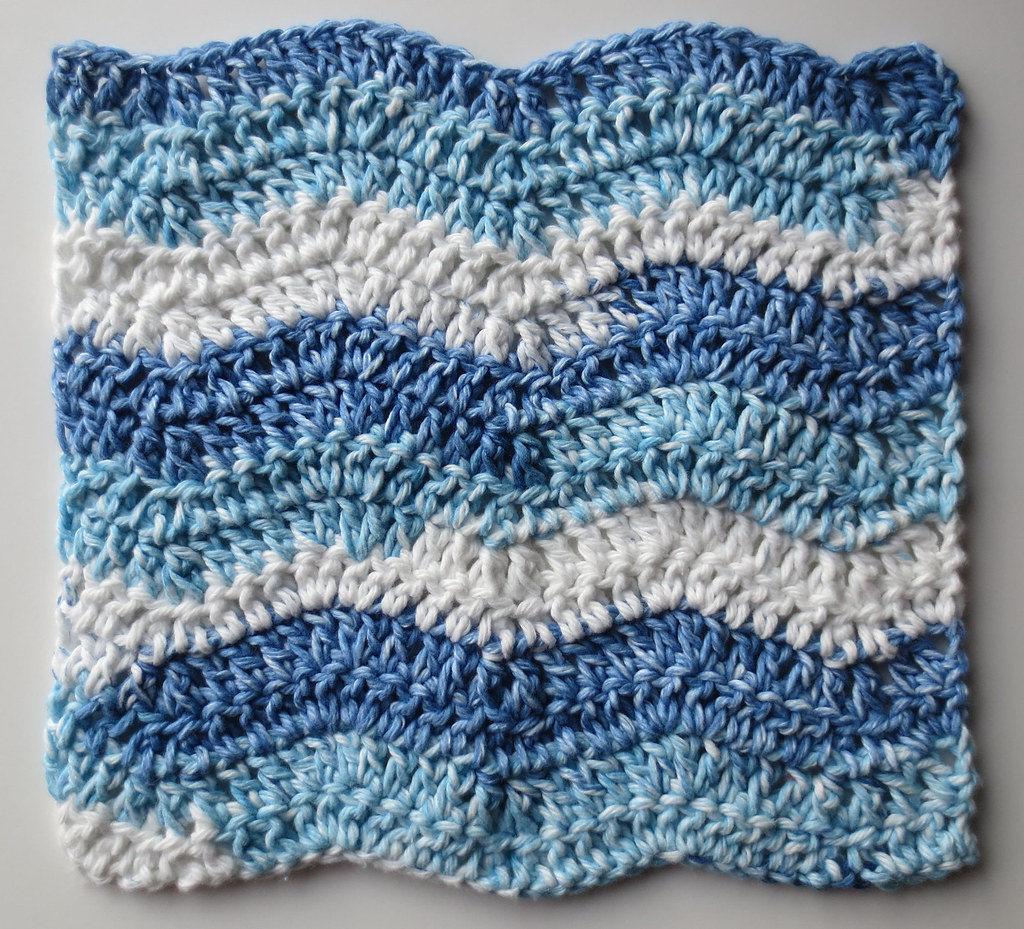
Here is my free crochet pattern for a wavy ripple dishcloth. I first used this wavy ripple style to crochet a lapghan and just love the look of the stitch pattern. So after some trial and errors, I came up with a dishcloth using blue tie-dye cotton Sugar ‘n Cream yarn.
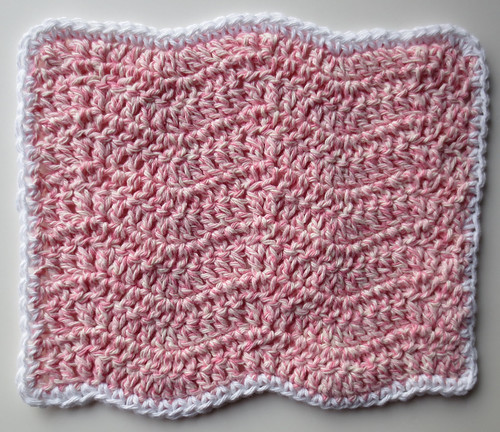
Here is another dishcloth I crocheted using the wavy ripple pattern. I ran out of the pink twist cotton yarn so I only crocheted 13 rows. I added a white edging around the entire dishcloth by working single crochet stitches around evenly. I worked 2 single crochet stitches in the corners. This trim edging gives the dishcloth a little different look and may be useful it you are trying to use up scrap pieces of cotton.
My crochet pattern may be used to make a wavy ripple dishcloth or washcloth. Mix and match colors to create your own unique crocheted cloths.
Free Crocheted Wavy Ripple Dishcloth Pattern
Description: 9-1/2 inches by 9 inches dishcloth
Hook: H (5 mm) crochet hook
Materials: 2 oz ball of cotton yarn such as Sugar n Cream
Ch 36.
Row 1
DC in 3rd st from hook,

This is my first wavy ripple project. I was inspired by Attic24 who did one of her beautiful colorful afghans using this stitch design. Here is a closeup of my wavy ripple pattern after I crocheted the stripes for one side of my lapghan.
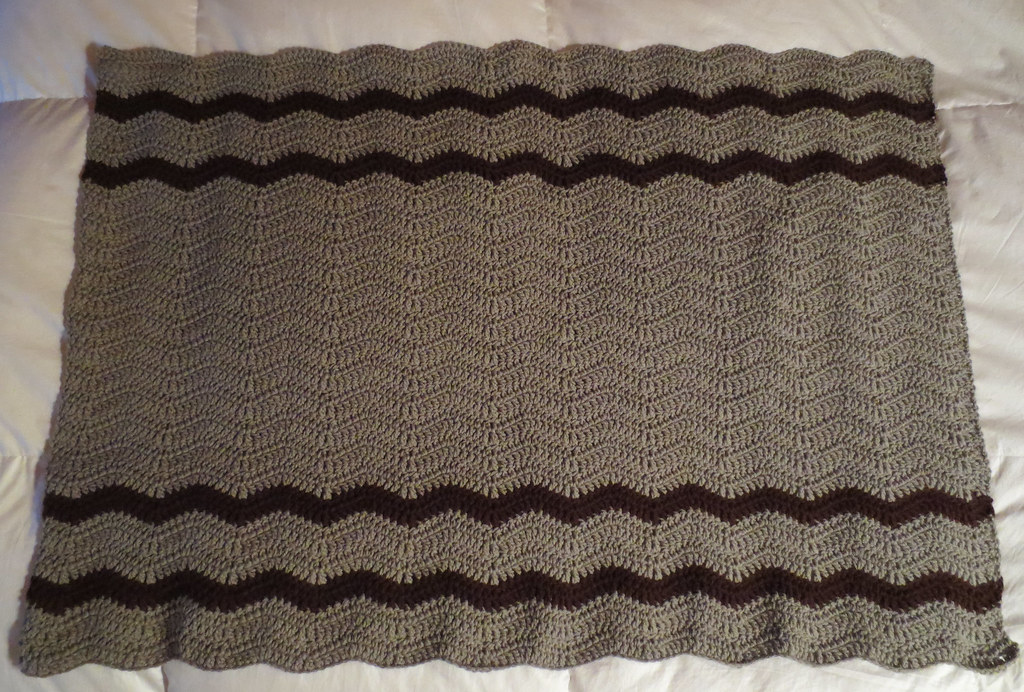
I set out to crochet my lapghan to fit a person in a wheelchair. I wasn’t sure about the starting chain number of stitches I would need for the lapghan so I ended up doing a chain of 145 stitches for my base row. Well it’s a lot wide than I would have liked at 44 inches so I ended up doing this as a long lapghan that goes down and covers a person’s legs. I crocheted this lapghan working it in rows vertically for a total of 48 rows. I used a Bernat 14 oz pounder-style worst weight yarn in a clay color along with some scrap brown yarn for stripes.
Here is the finished photo of my wheelchair wavy ripple lapghan.
Free Crocheted Wavy Ripple Lapghan Pattern
Description: Wavy ripple wheelchair lapghan blanket
Hook: H (5 mm) crochet hook
Gauge: 2 rows = 1 inch; 7 stitches = 2 inches
Materials: Bernat 14 oz/400 g yarn in clay and 3 oz of worst weight brown
Finished size: 30 inches wide by 44 inches long (wavy going up and down)
Crochet pattern written in US crochet terms.
Instructions for starting:
Chain 145 for base row.






Recent Comments