
I have been crocheting chain stitch scarves lately and came up with this stitch variation. On my chain stitch scarves, I change yarn colors every other row and just carry the yarn at the end of that row. I drop and pick up the new color after I crochet two rows.
On the first row of the new color, I do a single crochet spike stitch or long crochet stitch down into the first row of the prior new color. By working this long single crochet stitch, it creates a unique V stitch look to the scarf. Here is a closeup of one scarf I crocheted using the stitch design.
Here is a pink and white youth sized scarf I crocheted using the same chain stitch design. For the youth size, I crocheted a starting chain of 5 feet.
Spike Chain Stitch Scarf Pattern
H (5 mm) crochet hook
3 – 4 ozs Medium weight yarn in 2 colors for total of 7-8 ozs for adult length scarf
USA Crochet terms used in pattern
Row 1
Chain 7+ feet to start scarf. Don’t worry about stitch count as you can always just unravel any unused stitches of the base row you don’t need.
Row 2
SC in 2nd chain from hook and SC in the next stitch also.

Here is my very thick front post crocheted hat. The hat is crocheted by working all front post double crochet stitches in the round. The result is a comfortable very heavy winter hat that will keep you warm.
You can add a few extra rounds to make a longer hat as this is one more of a helmet cap as shown. I have included changes for a smaller ladies or youth size in the free crochet pattern below.
Thick Front Post Crocheted Hat Pattern
Hook: H (5 mm) US sized crochet hook
Materials: 3.5 ounces (200+ yards) Wool or Worsted Medium Weight Yarn
I love this Wool in Dark Navy used in hat shown. (210 Yards)
Finished size: 22 inch cir and 8 inches long for adult size hat
With H hook, Ch 4 and join to form ring. Hat pattern is worked in the round without turning.

Recycling thrift store sweaters is a great way to reclaim some nice yarn at a reasonable price. I recently picked up this mohair blend sweater from my local thrift store with high hopes to unravel the yarn. Well I soon found out that this sweater didn’t want to unravel and appears to be an interlocked knit.
I put on my thinking cap in an effort to upcycle this old sweater into some new and useful items. First I used the lower portion of the sweater to create a scarf cowl. Using some scrap yarn, I added two rows of single crochet along the lower edges to finish off the raw edges where the sweater body had been attached. My upcycled cowl was finished off with some wooden buttons from my stash.
Next I tackled using the sleeve as a plastic bag holder. The natural cuff on the sweater was perfect for transforming the sleeve into a handy bag keeper. As shown in the pictures, I folded under the top of the sleeve to the inside. Using a basting stitch, I sewed around the top edge about 1 inch from the top to create a casing for the ribbon tie closure. I machine stitched the basting to hold the fold in place and also so I could crochet in a straight line to create my casing. I left the back of the casing open where the sleeve seam is. Then using a small D crochet hook and some scrap brown yarn, I worked a slip stitch over the basting and through both layers to create my casing for the ribbon tie closure. See photos below and you can click on any other them to enlarge the pictures.
I added a hook hanger at the back by chaining the length I wanted and then worked back down the chain by working a single crochet stitch around the chain and attached both ends into the back of the bag keeper. I threaded a piece of ribbon through the casing and tied it at the back with a bow to complete the plastic bag keeper. I present the upcycled thrift store sleeve which has been transformed into a plastic bag holder.

I have a new crochet stitch that I am just in love with. It is called the V Stitch and it is very easy and simple to crochet many different projects using this stitch. I have already used the stitch pattern to make a blanket and a scarf.
There are several different versions of the V Stitch and I do mine without a chain stitch between my double crochet stitches. It makes for a less-holey project and works up faster for me without having to chain between stitches.
To crochet the small blanket or lapghan, I chained 101 stitches to start with a H (5 mm) crochet hook.

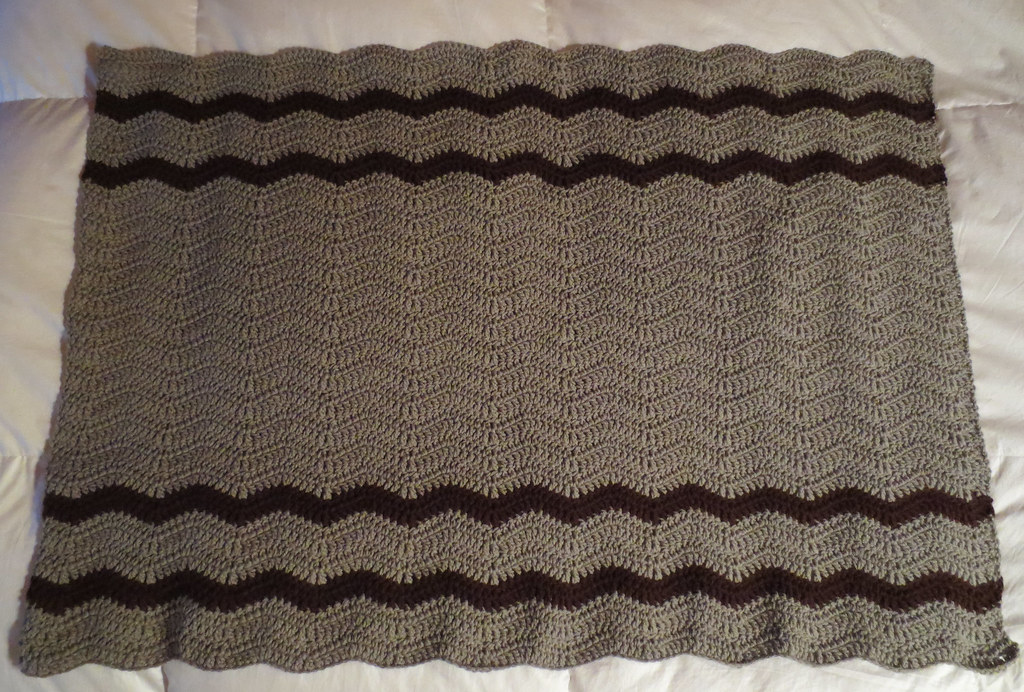
This is my first wavy ripple project. I was inspired by Attic24 who did one of her beautiful colorful afghans using this stitch design. Here is a closeup of my wavy ripple pattern after I crocheted the stripes for one side of my lapghan.
I set out to crochet my lapghan to fit a person in a wheelchair. I wasn’t sure about the starting chain number of stitches I would need for the lapghan so I ended up doing a chain of 145 stitches for my base row. Well it’s a lot wide than I would have liked at 44 inches so I ended up doing this as a long lapghan that goes down and covers a person’s legs. I crocheted this lapghan working it in rows vertically for a total of 48 rows. I used a Bernat 14 oz pounder-style worst weight yarn in a clay color along with some scrap brown yarn for stripes.
Here is the finished photo of my wheelchair wavy ripple lapghan.
Free Crocheted Wavy Ripple Lapghan Pattern
Description: Wavy ripple wheelchair lapghan blanket
Hook: H (5 mm) crochet hook
Gauge: 2 rows = 1 inch; 7 stitches = 2 inches
Materials: Bernat 14 oz/400 g yarn in clay and 3 oz of worst weight brown
Finished size: 30 inches wide by 44 inches long (wavy going up and down)
Crochet pattern written in US crochet terms.
Instructions for starting:
Chain 145 for base row.


Recent Comments