
I crocheted these scrubbies using recycled plastic bags that were cut into plarn. It reminds me so much of sea coral that I just had to call the scrubbers scrubbie coral. The inspiration for these scrubbies came from my friend Kristy who shared her cotton scrubbies at her blog Texiles4you.
People ask me all the time about the amount of plarn created by each plastic bag and while it may differ with one type of plastic bag to another, I found the standard white retail bags yield me about 7 yards of plarn when cut them 1″ wide and assembled using the looping method. The orange plastic newspaper bags provided me with 6 yards due to their smaller size.
With that in mind, you need 4 plastic bags to make each one of these scrubbies. The white scrubbies were crocheted just 4 rounds. I found I liked a bigger scrubbie so I crocheted the orange one five full rounds. By crocheting 5 rounds you use all of the plarn created from the 4 plastic bags where the smaller scrubbers only use a little over 3 bags.
You will find as your crochet each round that it begins to twist which is normal. The more rounds you crochet, the more twist you get. Have fun with the colors and mix and match them. I plan to crochet more of these scrubbies and add a different color just on the final round which should create an even more unique coral look for the scrubbies.
***************************************************************************************************************************
Plarn Scrubbie Coral Pattern
Materials needed:
Plastic bag yarn or Plarn 4 plastic bags cut into 1 inch wide strips
as shown in my plarn making tutorial
Hook: N (9 mm) size metal hook
Description: Recycled Plastic Scrubbie
Scrubbies are about 3-1/2 – 4″ wide depending on if you do 4 or 5 rounds
Directions:
Rnd 1
Ch 2 and work 8 Sc in the 2nd ch from hook. Do not join and continue working in rounds. Use a stitch marker if necessary so you know where each round starts.
Rnd 2
Work 2 Sc in each st.
Rnd 3-5
Work 3 Sc in ea st.
Option: For a smaller scrubbie, crochet just 4 rounds.
If you have any questions or find discrepancies in this pattern, please email me using contact tab above.
Abbreviations:
Ch – Chain
Ea – Each
FO – Finish Off
Hdc – Half Double Crochet
Inc – Increase
Plarn – Plastic Bag Yarn
Rnd – Round
Sc – Single Crochet
Sk – Skip
Sl St – Slip Stitch
St – Stitch
This pattern is copyrighted by Cindy of My Recycled Bags {dot com} and may only be used for private individual use. No commercial sales or use is permitted. Links to this pattern are acceptable. ©2011
****Please do not copy my patterns on your blog site or post my patterns on Internet sites. I do not allow my patterns to be republished without expressed written permission. Posting of my patterns, without […]

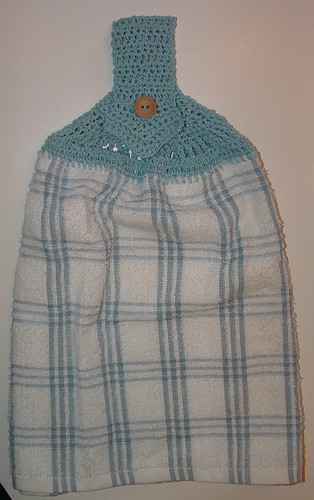
Here is my latest towel topper crocheted pattern. It is a double layer towel that is folded over and requires no cutting or sewing. The towel topper is simply added by working a base row along the top edge of the towel using a small steel crochet hook. I have a picture tutorial here that shows in more detail how I fold, pin, and crochet the first base row through both layers of the folded towel.
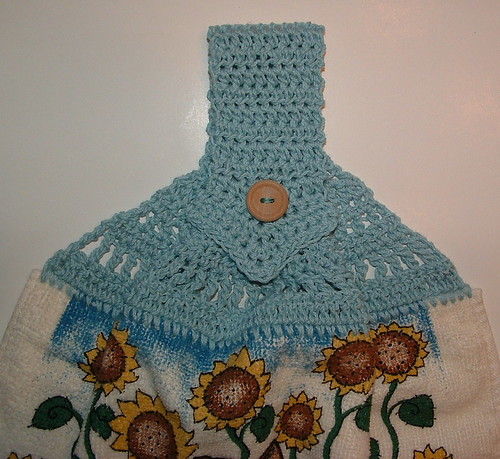
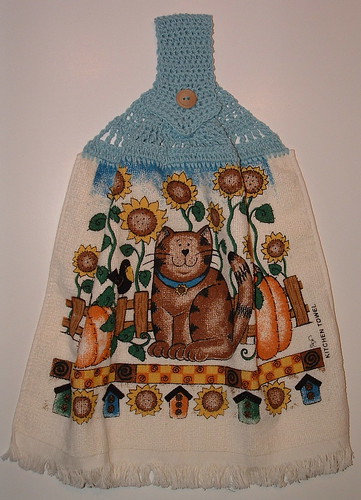
Here is another one I did using a printed novelty towel.
*******************************************************************************************************************************
Pointed Handle Towel Topper Pattern
Materials needed:
1- Kitchen towel or decorative towel (15 inches wide x 24 inches long used)
1- oz. Sport weight mercerized Cotton
1- 3/4 inch button
Hooks:
#7 Steel hook
G (4-4.25 mm) hook
Directions:
This towel topper uses the double layered fold and pin method. See my picture tutorial on how to prepare the top of towel to begin Sc stitching along top edge if you are not familiar with this no-sewing or cutting method. All crochet terms are US as shown in this pattern.
Row 1
Fold the towel exactly in half and using the steel crochet hook to poke holes, Sc evenly along the top edge of towel. (You will be Sc’g through both layers of the towel along the top edge.) I had 60 Sc along the top of the edge but it will vary depending on your stitch placement and yarn weight used. Just try and have an even number of stitches along the top. Otherwise it doesn’t matter how many stitches you have along the top of the towel.
Row 2
Using the G crochet hook, Ch 2, turn. Dc in each st.
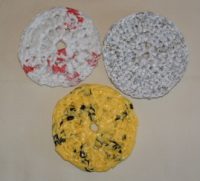
Here is my parade of pot scrubbers crocheted from recycled plastic bags!
I used several different types of plastic to create these pot scrubbies. The yellow and white/red ones were crocheted using the pattern below with a “N” hook. The white/gold one was made from a recycled plastic wedding bag. You can read about that project here. This scrubber was made using a “H” hook rather than the bigger hook as the plastic yarn was single strand. It is a much tighter stitched scrubber than the ones with the bigger hook. Here is the free pattern link for that scrubber.
So depending on your project either use the pattern below for pot scrubbers made from recycled plastic grocery bags or the link above for the single strand plastic strips.
____________________________________________________________________
Free Crocheted Pot Scrubber Pattern using Plastic Grocery Bags
Scrubber measures 3-1/2 inches wide across. (Make 2 round disks)
Material: Plastic bags cut into 1 inch strips
Hook: Metal N (9 mm) crochet hook

Here are a few potholder towel combo ideas. First is a Fall themed potholder from the Dollar Store that I added a towel to the bottom of the potholder.
The towel is folded in half and I used a needle and thread to run a baste stitch through the center for gathering. I then gathered the center of the towel to match the bottom of the potholder.
Below is a photo of the front with it pinned in several areas. You can either machine stitch the towel to the potholder or hand stitch it in place. For this project, I hand stitched the towel to the bottom edge of the potholder. I was able to hide my stitches using brown thread and pulling up under the red trim edge of the potholder. I secured the towel tightly by doing many stitches and making sure it wasn’t going to pull loose. See photos below for more details and you can click on them to supersize the photos.

Here is a project where you use a store-bought potholder and add a crocheted towel to it. I’ve seen other similar projects that you sew a towel to the potholder to create the combo but not crocheted.
The hard part is crocheting the base row across the middle of the potholder. You want to fold the potholder in half and mark the center with a pencil mark. Then you crochet across the marked line in single crochet (SC) stitches evenly. I used a steel #9 crochet hook to poke the holes and pull the yarn through the holes. This process is hard and takes patience. You need to push and wiggle through the potholder to make the holes and then draw the yarn up to complete the SC stitch.
Once you have the base row complete, crocheting the remainder of kitchen towel is super easy.
Here are more photos of the potholder with both sides showing.
Click below to see more photos and for the full free pattern directions.
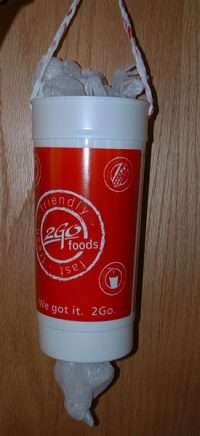
I have had several requests for recycled crafts projects that kids can do. With that in mind, here is a quick upcycle project that children and adults can both enjoy. First you need a large plastic container. The container I used was a 64 oz. soda pop cup that I found and decided that I would re-purpose into a plastic bag keeper.
Here is the finished plastic bag keeper
Below is a picture tutorial that I put together to show the steps for this project.

I noticed that I had several old potholders that were stained and had holes in them. So I figured it was time to recycle them into some new and pretty potholders.
Here are the before pictures of my old potholders.
I crocheted a chain the length of the old potholder plus 3 stitches. Then single crochet (Sc) in the round until the shell is long enough to insert the old potholder inside.

Got some old jeans? Well how about recycling the hems into some cool coasters. I saw the idea over at Going Green Crafters where they used the hems from old jeans to create denim coasters.
I just love recycling denim and had to try this craft project. I used two inside hems from a pair of old jeans to create my coaster. Trim the edges very close and evenly with a pair of sharp scissors.
Next I spliced my two hem strips together with a thread and needle. Just do a few hidden slip stitches to secure your two denim pieces together. You can click on any of the photos to supersize them.
Using a fabric glue, roll up your denim hem and apply a line of glue along the inside of the strip. Work your way along by tightly rolling up the denim and applying the glue until you get to the end. I added a extra bit of glue at the end and left the coaster to dry for several hours on a flat surface to make sure the coaster would set up nicely.
Here is my finished denim coaster. It measures about 4 inches wide. I left the bottom hem end on it as I thought it added character. You could cut it off or add another hem strip to make your coaster larger as desired. Now I’m ready to go out and enjoy a hot cup of coffee using my new recycled denim coaster.

Recycling your old jeans into new and useful things is fun and frugal. The denim recycled from old jeans is very durable and the fabric is very versatile. Oh and the best part, when you recycle denim from materials you have on hand, its FREE.
Today I want to share how to make an oven mitt from your old jeans. There are several good tutorials on the Internet showing how to create a homemade oven mitt. (Edit:) Here is a oven mitt template you can use. The original one I used is no longer free so the link has been changed to one that is free.
Cut two denim panels using the mitt template. Then cut two from fabric for your lining and two for your mylar batting. If you don’t want to use store bought mylar batting, just cut two pieces from old towels but make sure they are thick so you get enough protection for inside of your mitt.
Click on any photos to supersize
Because denim is so hard to machine sew through several layers, I assembled my oven mitt in two pieces. First pin the two denim panels together with right sides together. Machine sew the two denim panels together using a narrow hem around the mitt. Leave the end hem unfinished at this point. Trim curves and clip at thumb turn. Turn wrong sides to the inside. Using a pencil’s eraser end, push out the thumb and edges. Press with hot iron and turn under a narrow hem along the unfinished edge of the denim mitt shell.
Next put the two fabric lining panels together with right sides together. Then add a batting layer to the bottom and top of your lining insert. Pin in place and machine stitch a narrow hem around the mitt. Leave the end hem unfinished for now. Trim edges and clip at thumb curve but don’t turn. Turn under a narrow hem and press with a hot iron along the unfinished edge of the fabric lining.
Lastly insert your fabric lining inside your denim oven mitt. Check fit and trim edges if necessary so the insert fits nicely inside your denim mitt shell. Match hem edges and pin the two edges together. Machine stitch very close to the edge to enclose the hem of the denim panel and the lining insert. Fold over the edge if desired to show off your fabric lining or add embellishments to the outside of the mitt.
Need a potholder to go along with your oven mitt? You can add a denim potholder that sports a pocket from a pair of jeans to create a cool recycled denim kitchen set.




Recent Comments